A lot of property owners only discover the gap after they've already opened the claim. The insurer asks for proof of damage, the contractor points to hidden loss, and the pre-purchase home inspection sitting in your email turns out to be the wrong document for the job. That mismatch is where good claims stall, because a professional property inspection for insurance is not the same thing as a buyer's walkthrough before closing.
The stakes are practical, not academic. A standard home inspection is a limited, non-invasive visual examination of accessible systems and components, focused on what can be seen at the time of inspection, not on hidden causes or forensic reconstruction NACHI standard of practice. In claims work, that scope matters. If the damage source is behind a wall, under a floor, or inside a cavity, the report may document the symptom, but not the full loss picture.
What a Professional Property Inspection Actually Covers
A storm rolls through, the ceiling leaks, and the insurer asks for a report. The owner pulls the inspection from when they bought the house and expects it to solve the problem. It usually doesn't, because that earlier report was built for a real-estate decision, not for proving an insurance loss.
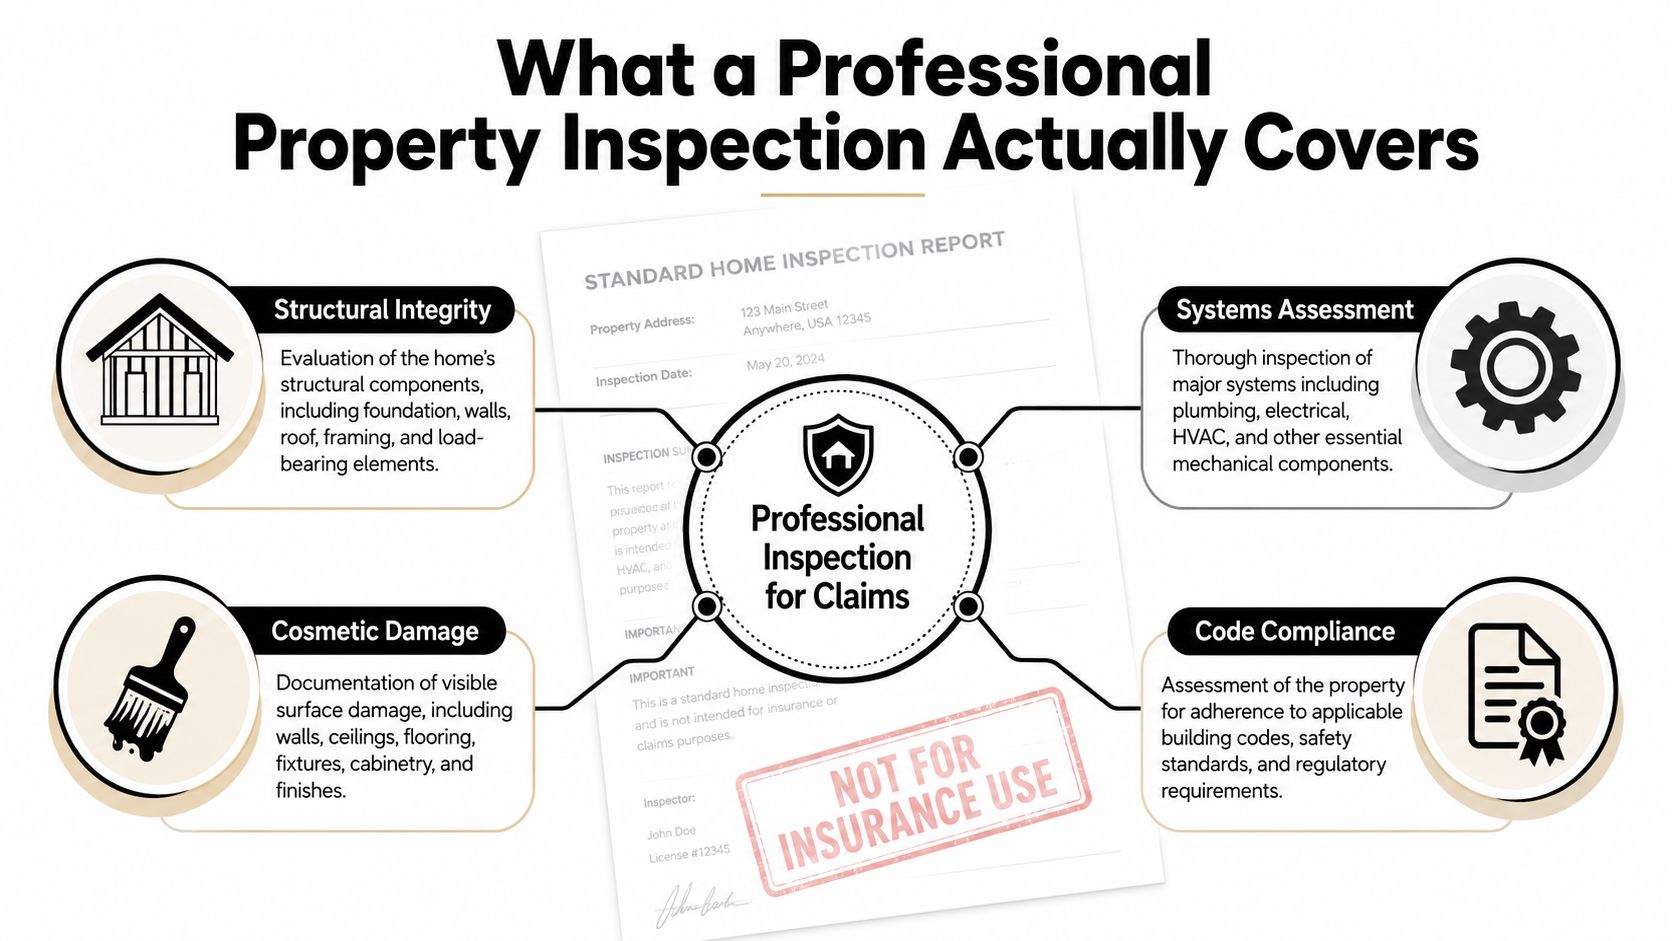
A true professional property inspection is narrow in method and useful in the right context. It documents accessible conditions, visible damage, and the state of building systems at the time of the visit. It does not promise a root-cause determination for hidden failures, and it does not replace a forensic engineering review when the loss involves disputed causation or concealed structural concerns.
What it sees and what it doesn't
That distinction is why a report can be helpful and still incomplete. The inspector can photograph staining, cracked finishes, displaced trim, rusted components, and obvious distress in accessible areas. The inspector generally cannot see inside wall cavities, under slabs, or through sealed assemblies unless the assignment expands into specialist testing or invasive investigation.
For claims, that limitation is both the strength and the weakness of the inspection. It is strong because it creates a clean contemporaneous record of visible damage. It is weak because insurers can argue that visible symptoms alone don't prove the full extent of concealed loss.
Practical rule: If the assignment is for a claim, ask whether the inspector is documenting condition, scope of loss, or causation. Those are different tasks, and one report rarely does all three well.
A useful way to think about it is this. A pre-purchase home inspection asks, “What condition is the property in today?” A forensic claim review asks, “What happened, what was damaged, and what evidence supports the loss?” For a deeper structural context, see this structural damage inspection resource, which helps separate surface defects from load-bearing concerns.
Types of Property Inspections and Their Scope
After a loss, property owners often order the closest-sounding inspection instead of the right one. That's how a water problem gets treated like a routine maintenance visit, or a fire claim gets supported only by photos of soot on one wall. The right inspection depends on the loss event and on what the insurer is questioning.
The four common claim-related inspection types
A structural inspection focuses on framing, foundation, load paths, and signs that the building has shifted, sagged, or lost integrity. It makes sense after impact, fire, long-term leakage, or visible cracking that suggests more than cosmetic damage. The examiner looks for displacement, separation, deflection, and other signs that the structure itself may have been affected.
A moisture and water intrusion inspection maps where water entered, how far it traveled, and which materials absorbed it. The work often uses moisture meters and thermal imaging to follow the spread of wetting across floors, walls, and ceilings. This matters after burst pipes, roof leaks, storm intrusion, or appliance failures, especially when drying or demolition hasn't started yet.
An electrical and mechanical systems inspection checks whether power, wiring, panels, fixtures, plumbing components, or HVAC equipment were compromised by fire, water, or surge conditions. Safety issues become apparent during this process. Scope often expands as well, because one damaged component can affect multiple systems.
A forensic inspection is different. It's built for insurance disputes, where the question is not just what's damaged, but how the loss connects to the reported peril and what evidence supports the claimed scope. For a fuller explanation of that assignment type, the forensic investigation overview is the right conceptual match.
| Property Inspection Types Compared | Primary Scope | Common Tools | Typical Trigger |
|---|---|---|---|
| Structural inspection | Framing, foundation, load-bearing elements | Visual survey, level, camera, measuring tools | Cracking, impact, fire, settlement, long-term leak |
| Moisture and water intrusion inspection | Wetting extent, source path, affected materials | Moisture meter, thermal imaging, camera | Flooding, roof leak, pipe break, appliance leak |
| Electrical and mechanical systems inspection | Safety, function, visible damage, code concerns | Visual checks, test devices, infrared in some cases | Fire, water exposure, power surge, equipment failure |
| Forensic inspection | Causation, scope of loss, claim support | Photos, measurements, specialized testing, records review | Claim dispute, denial, underpayment, litigation support |
The big trade-off is depth versus speed. A narrower inspection is faster and cheaper, but it may leave the insurer room to narrow the claim. A more detailed assignment takes longer, yet it gives the policyholder a stronger factual record.
What Inspectors Examine During a Post-Damage Assessment
A solid post-damage inspection follows the path of the loss, not just the path of the room tour. The goal is to connect exterior entry points, interior symptoms, and system impacts into one coherent record. That's what makes the final file useful when the insurer starts asking where the damage started and how far it spread.
Exterior and structure first
The work usually starts at the outside envelope. Roof surfaces, flashing, siding, windows, doors, gutters, grading, and drainage all matter because they show where wind, water, or impact may have entered. Once inside, the inspector checks foundation conditions, framing movement, load-bearing elements, and any visible separations or deflection.
Interior finishes get examined next. Water staining, bubbling paint, warped flooring, cracked drywall, displaced trim, and odor can all support the timeline of loss. After fire, inspectors also look for smoke pathways, soot deposition, and heat-related distortion in places property owners often overlook.
Systems and claim documentation
Electrical panels, outlets, wiring, plumbing fixtures, supply lines, and HVAC components deserve careful review after fire or water events. The point isn't to guess at the hidden failure. The point is to document visible impact, unsafe conditions, and the components that now need specialist attention.
This is also where documentation standards matter most. A claim-ready inspection should include timestamped photographs with scale references, moisture readings mapped to rooms or floor plans, and notes that tie each observation back to the reported cause of loss. If contamination is suspected, material samples or specialist testing may be needed, but those steps should be clearly identified as separate from the visual inspection itself.
For homeowners who want a practical visual reference while they gather their own photos, detecting water damage while viewing is a useful companion. It's especially helpful for spotting stains, discoloration, and other early clues before cleanup changes the scene.
The best claim file usually starts before the restoration crew arrives.
Keep the area preserved until the inspector has finished. If evidence gets cleaned, removed, or replaced too early, the report can only document what's left.
Public Adjuster Inspections Versus Standard Home Inspections
Buyers and policyholders use the word “inspection” as if it means one thing. It doesn't. A standard home inspection serves a different audience than a public adjuster inspection, and the report format follows that difference all the way through the claim process.
Side by side comparison
| Criterion | Public Adjuster Inspection | Standard Home Inspection |
|---|---|---|
| Purpose and audience | Document insured loss for the policyholder | Inform a buyer or seller about condition |
| Scope of examination | Damage, causation, scope, and supporting evidence | General visual review of accessible systems |
| Documentation standards | Claim-ready photos, measurements, and narrative support | Condition-focused summary with flagged defects |
| Tools and technology | Moisture meters, thermal imaging, detailed reporting software, sometimes drones | Basic visual tools and report software |
| Downstream use | Claim negotiation, supplemental demand, appeal support | Purchase decision, repair planning, disclosure |
A public adjuster inspection is built for an adversarial environment. That means every observation has to stand on its own and support a larger loss narrative. A standard home inspection, by contrast, is usually neutral and broad, which is fine for a real-estate transaction but often thin for a disputed claim.
Practical takeaway: If the report was written to help you buy a house, don't expect it to carry a fire, water, or wind claim by itself.
The difference shows up in the language too. A buyer's report might say a component is worn, outdated, or in need of maintenance. A claim-focused report has to connect damage to a covered event and show why the affected scope belongs in the file. That's why many owners discover too late that the inspection they already paid for wasn't built to prove loss.
When to Order a Professional Property Inspection
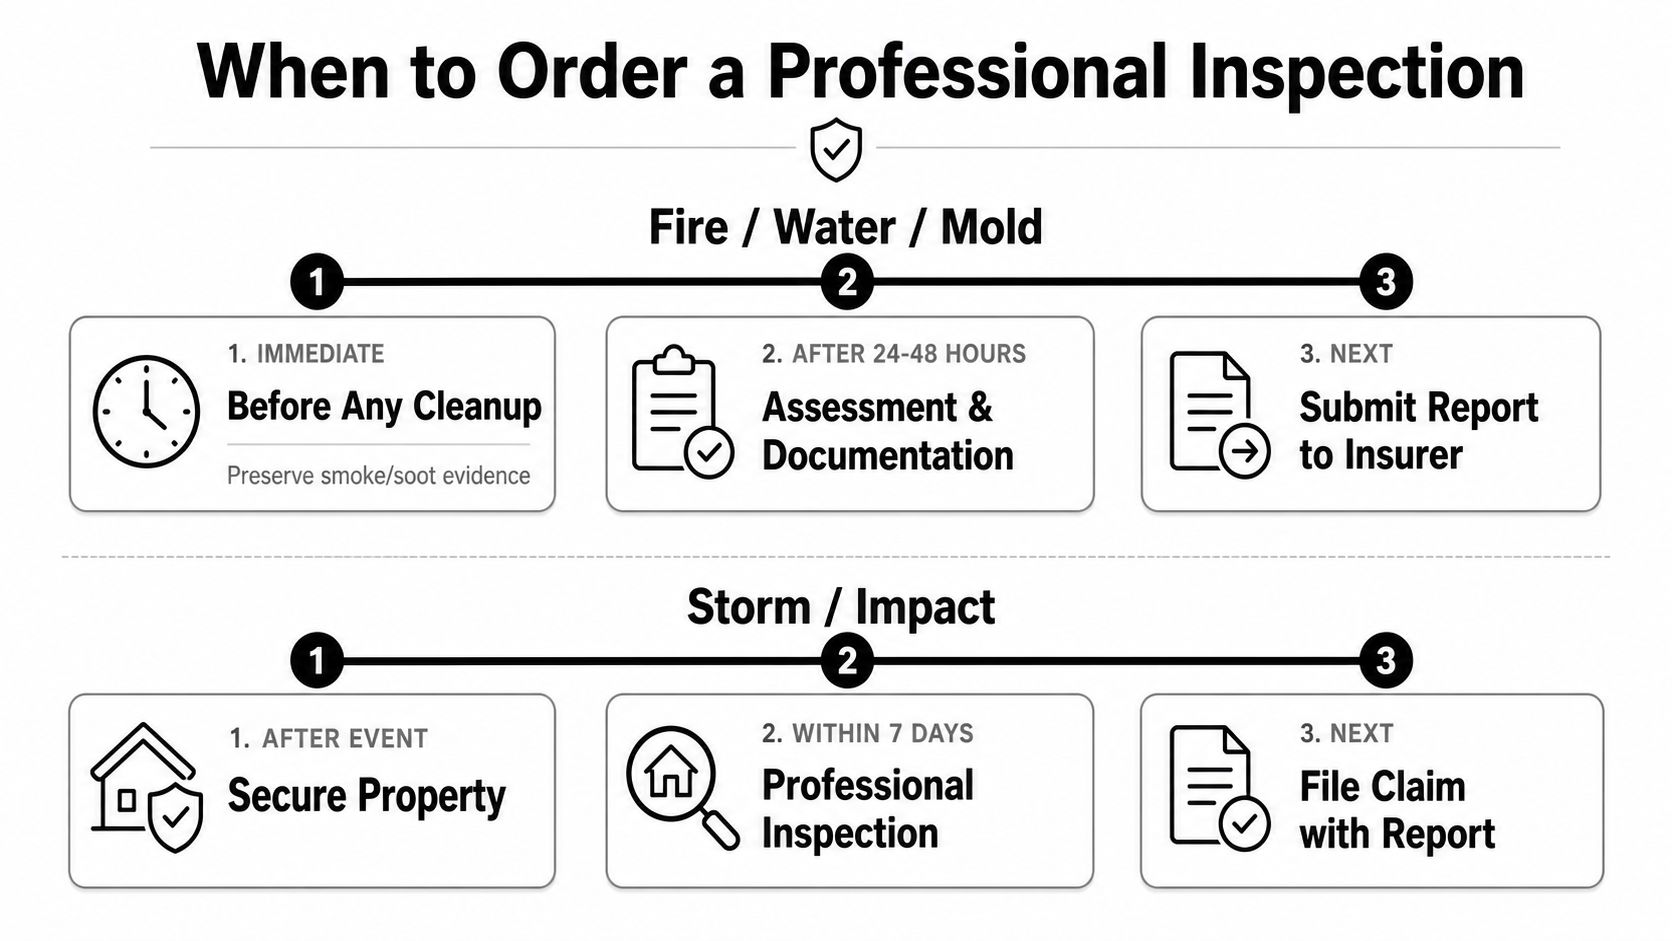
Timing changes the quality of the evidence. Order too late, and cleanup, drying, or temporary repairs can erase the very conditions the report needed to capture. Order too early in the wrong way, and you may spend money on a report that doesn't yet reflect the full extent of the damage.
Match the timing to the loss
After fire damage, the inspection should happen before cleanup starts. Soot patterns, smoke residue, heat distortion, and weakened materials can be altered quickly once demolition begins. If the scene changes before documentation, the record becomes harder to defend.
After flooding or water intrusion, speed matters because hidden wetting can keep spreading and materials can change fast. The inspection should map conditions before drying efforts, dehumidifiers, or tear-out reshape the evidence. If a mold concern is developing, the report should capture the condition before the visible signs get scrubbed away.
After wind and storm events, roof and envelope inspections should be done before permanent repairs, and any tarping should be photographed. The same applies after vandalism or intentional damage, where the property needs to be cataloged before cleaning or disposal begins.
After the initial claim setup, a professional inspection also becomes important if the insurer's estimate looks light, a contractor finds more damage during repairs, or a claim gets denied and the policyholder needs independent documentation for appeal. In those situations, the inspection is less about discovery and more about building the record the carrier should have seen from the start.
A simple decision point
If the damage has changed since the event, your window for useful evidence is shrinking. If the property is still untouched, call before anyone cleans, cuts, dries, or replaces. If the scene has already been disturbed, the inspection still helps, but the report has to work harder to reconstruct what's gone.
Documentation and Reporting Standards for Insurance Claims
A report only helps a claim if it can survive pushback. Carriers look for gaps, vague wording, and missing support because those weaknesses let them narrow scope or question causation. The strongest reports avoid that trap by making every major statement traceable to a photo, measurement, or observed condition.
What a defensible report includes
Start with a clear narrative. The report should identify the property, the reported event, the conditions observed, and the areas inspected. It should also say what was accessible and what wasn't, because access limits affect how much weight the file can carry.
Next comes the photography. Good photos are organized by area, labeled, and tied to the text so the reader can tell exactly what each image shows. Measurements matter too. Moisture readings, visible deflection, and material deterioration give the insurer more than a visual impression, they give the claim objective points to evaluate.
Costing is another dividing line. If a report includes estimates, they need to point to specific damage items instead of broad, unsupported allowances. A vague number without a clear basis invites pushback. A line-item approach is easier to defend because it ties the work to actual observed loss.
Commercial claims follow the same logic, only with broader systems. The standard practice is a visual walk-through, property research, and a condition report that links observed defects to building condition, maintenance risk, and operational impact commercial standards of practice. That structure matters because commercial losses often affect more than one system at once.
If you're trying to understand how proof gets organized in a claim file, the proof of loss guide is a good reference point. It shows why a report and a claim statement have to align instead of competing with each other.
Bottom line: A report that lacks photos, measurements, and a clear damage narrative gives the insurer room to discount the loss.
Ask for the draft format before you hire anyone. If the inspector can't explain how the report will support a carrier review, you're probably paying for documentation that looks official but won't carry much weight.
How to Choose a Qualified Inspector in Oregon and Washington
Not every inspector who can spot a stain can support a claim. In Oregon and Washington, the licensing and regulatory framework matters, and the person you hire should be able to explain both their authority and their method without dodging the question.
What to verify before you hire
First, verify licensing. Oregon and Washington both regulate public adjusters, so the person or firm should hold the proper license for the state where the loss is being handled. That matters because claim work isn't just inspection work, it's documentation inside a regulated claims environment.
Second, ask for claim-ready samples. Redacted reports tell you far more than a polished sales pitch. Look for photos with captions, room-by-room organization, and language that clearly links damage to the loss event instead of just describing defects.
Third, confirm professional insurance and bonding. If the inspector is working in a contentious claim, you want coverage behind the work, not just a promise. Fourth, check references and reviews from people who used the report in an actual claim, not just in a pre-purchase context.
Tools matter too. Thermal imaging, moisture meters, drone roof work where appropriate, and detailed reporting software are baseline expectations for claim-oriented inspections. For a job and workflow example, see this building inspection job resource, which helps show the level of coordination these assignments usually require.
Red flags are easy to spot once you know what to ask. Verbal-only assessments are weak. So are inspectors who can't explain their report format, won't show sample deliverables, or act as if a quick look is enough to close a claim file. The same goes for anyone who can't say how long the report usually takes.
Your Property Inspection Action Checklist
Before you schedule anyone, gather your claim paper trail and photograph the damage as it exists right now. Pull your policy, any denial or estimate letters, contractor notes, and the date of loss. Tell the inspector the covered peril you're dealing with, because a fire file needs different documentation than a water or wind file.
Use this short checklist:
- Before the visit: Photograph every affected area, save all insurer correspondence, and note what happened first.
- When vetting inspectors: Ask for license verification, sample reports, tool list, and turnaround time.
- On inspection day: Stay available, give access to attic, crawlspace, roof access points, and utility areas, and point out hidden concerns.
- After the draft report: Check that the damage is described accurately, ask for revisions if anything is understated, and confirm the final version is formatted for carrier submission.
The right inspection doesn't just document damage. It helps prevent the insurer from defining your loss too narrowly.
If your property has already taken a hit, NW Claims Management can help you get the right claim documentation in place before the file goes sideways. Their team works with Oregon and Washington policyholders who need inspection support, loss valuation, and claim representation that's built for real-world disputes. Visit NW Claims Management to get a clearer read on your next step.