Water is on the floor. A cabinet toe-kick is swelling. Drywall has started to darken. You’re trying to figure out whether to call a plumber, a mitigation company, your insurer, or all three at once.
That’s the moment most Bellingham homeowners lose time.
In water damage restoration bellingham wa, the fastest path back to normal usually involves two tracks running at the same time. One track is the physical restoration of the house. The other is the financial recovery of the insurance claim. If you only focus on cleanup, you can end up with a house that’s drying out and a claim that’s already headed in the wrong direction. If you only focus on the claim, the damage can spread while paperwork sits on the table.
A restoration contractor handles extraction, drying, cleanup, and rebuild. The insurance side is different. Someone has to prove the full scope of loss, connect the damage to the covered event, and make sure the claim reflects what happened inside the structure, not just what was obvious on day one.
Your Bellingham Home is Flooded What Happens Now
A common local scenario often begins unnoticed. It’s a rainy weekday in an older Bellingham home. A supply line under the sink fails, or a pipe lets go inside a wall, or water slips in where roof or flashing trouble has been building for months. By the time you notice it, the flooring is wet beyond the visible area and water has already moved into baseboards, insulation, and the wall cavity.
That’s why the first few decisions matter so much. In Washington, water damage restoration costs can range from $1,500 for minor leaks to over $50,000 for severe events, according to Washington water damage cost data. The same source notes that water damage and freezing account for 23% of all property damage claims nationally, which tells you this is common, but it’s never simple when it’s your house.
Two problems start at once
Most homeowners think they have one emergency. In reality, they have two.
The first problem is physical. Water has to be stopped, extracted, and dried properly. Materials that can’t be saved have to come out. Materials that can be saved have to be protected before they deteriorate further.
The second problem is financial. Insurance carriers don’t pay because water showed up. They pay based on the policy language, the cause of loss, the documented scope, and the evidence supporting the amount claimed. Those are not the same thing.
Practical rule: The company drying your home is documenting the job they were hired to perform. That does not automatically mean your entire insurance loss has been fully documented.
What works and what doesn’t
What works is treating the event like a coordinated response. Get the source controlled. Get mitigation started. Start your own photo and video record before the scene changes. Keep every invoice, moisture report, and communication.
What doesn’t work is assuming visible damage tells the whole story. It rarely does. Water travels. It follows framing, settles under flooring, moves behind trim, and reaches places the first glance misses.
If you need a practical checklist to steady yourself in the first scramble, these immediate flood recovery steps are a useful outside reference because they focus on calm, sequential action instead of panic.
The first goal is control
You don’t need to solve everything in the first hour. You need to create control.
That means making good decisions before damage expands, before evidence disappears, and before an insurance narrative forms around an incomplete picture of the loss.
First 24 Hours Emergency Actions to Take
The first day is about mitigation, not repair. Your job is to prevent the loss from getting worse and to protect the evidence of what happened.

Acting within the critical 24 to 48 hour response window can significantly reduce restoration expenses by preventing secondary damage and mold colonization, and the mitigation phase, including water removal and drying, must precede remediation according to this water restoration timing guidance.
Safety comes first
Before you touch anything, check for hazards.
- Shut off the water source: If the loss came from a plumbing failure, stop the flow at the nearest shutoff or the main.
- Watch for electrical risk: If water is near outlets, appliances, or the panel area, don’t walk into standing water until power to the affected area is safely disconnected.
- Treat contamination seriously: If the source involves sewage or unknown water, don’t start DIY cleanup with a shop vacuum and household fans.
If you aren’t sure the area is safe, step back and let the right trades handle first entry.
What to do in order
The order matters more than people think.
Stop the source
A burst line, failed appliance hose, overflowing fixture, or roof entry point needs immediate control. Drying efforts are wasted if water is still entering the structure.
Document before moving too much
Take wide shots, medium shots, and close-ups. Photograph flooring transitions, swollen trim, stained ceilings, warped cabinet panels, and any visible source of water.
Call emergency mitigation
You want extraction and drying equipment on site as soon as possible. Ask whether they use moisture meters and thermal imaging, and whether they’ll provide drying logs and moisture readings.
Protect contents
Move photos, electronics, documents, rugs, and sentimental items to a dry room if it’s safe to do so. Put aluminum foil or wood blocks under furniture legs if the furniture must stay in place.
Notify your insurer
Open the claim promptly. Keep the report factual and simple. Date of loss, what happened, what areas are affected, and what emergency services you’ve called.
For homeowners trying to organize the insurance side early, this guide on how to file a flood insurance claim is helpful because it shows what information carriers typically want first and where people often leave gaps.
If you wait for “things to dry on their own,” you usually trade a smaller mitigation bill for a larger restoration problem.
What not to do
A few mistakes create trouble fast:
- Don’t tear out materials too early: Once materials are removed without documentation, causation disputes get easier for the carrier.
- Don’t use ordinary fans as your whole plan: Air movement helps, but uncontrolled drying can miss hidden saturation.
- Don’t throw damaged items away yet: Contents often matter to the claim even when they can’t be saved.
- Don’t sign broad repair approvals in a rush: Emergency mitigation and full reconstruction are different decisions.
The first 24 hours aren’t about perfection. They’re about preserving safety, reducing spread, and keeping the claim supportable.
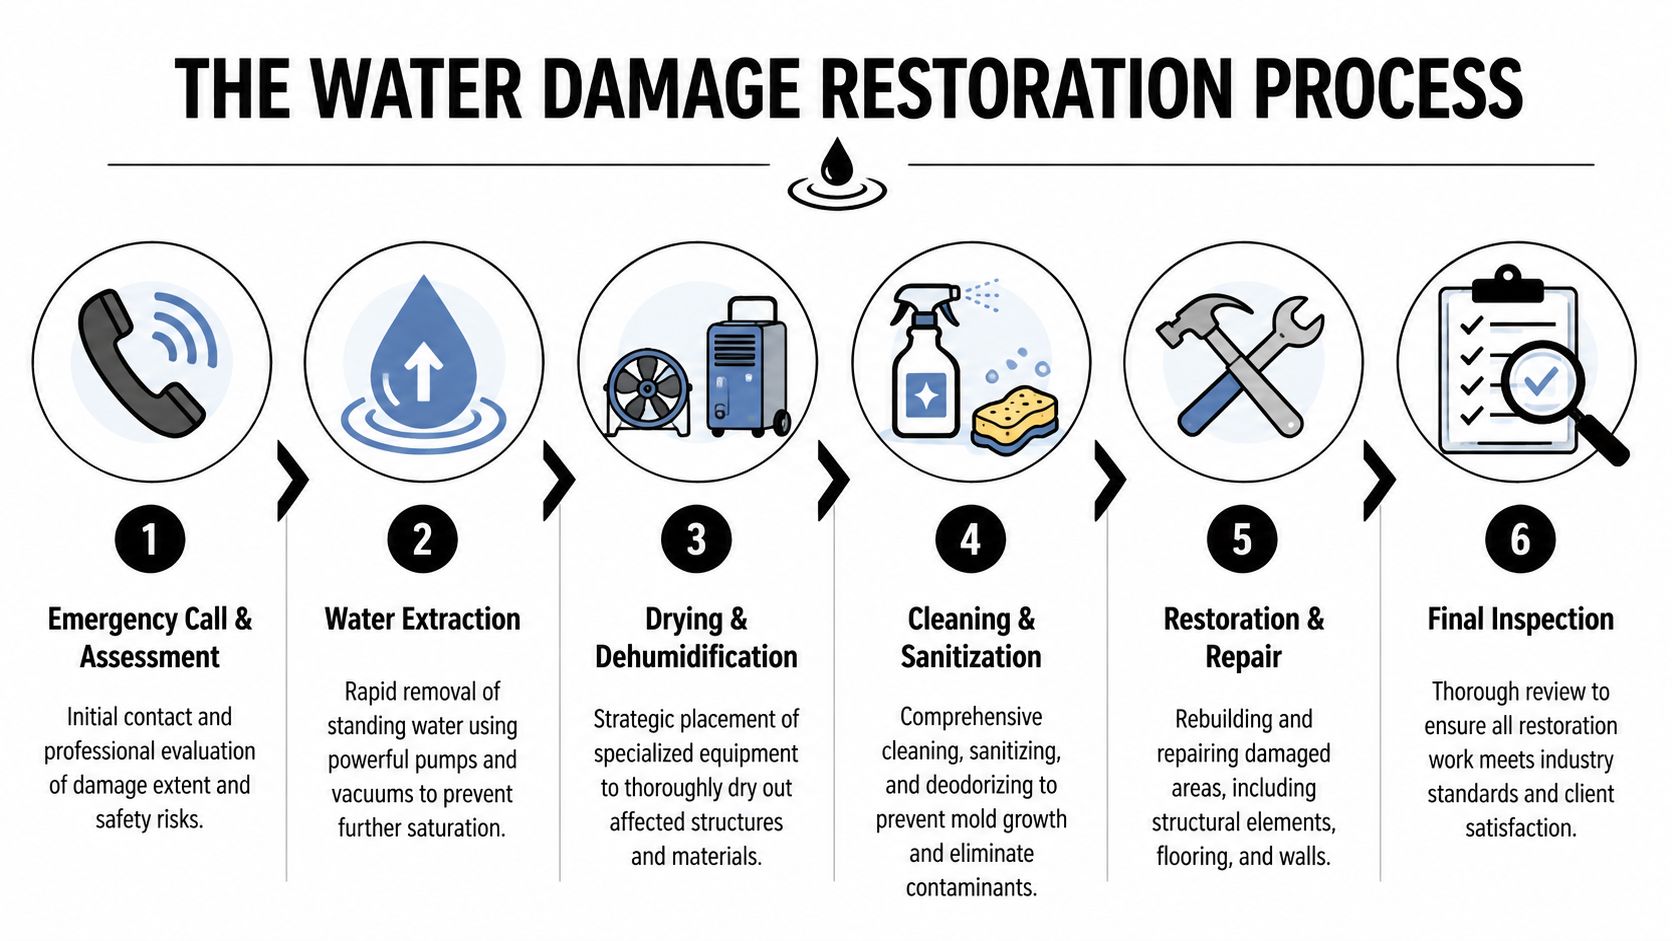
The Restoration Process from Drying to Rebuilding
Once the emergency crew arrives, the work becomes more technical. Good restoration companies don’t just “dry the room.” They build a drying plan based on where water went, what materials were affected, and what can still be saved.
Inspection is more than looking around
The first inspection should answer three questions. Where did the water originate? How far did it travel? Which materials are wet beyond recovery?
This is where tools matter. Professional restoration involves more than just drying. It requires differentiating between salvageable and unsalvageable materials, documenting hidden moisture with thermal imaging for the claim, and continuous moisture monitoring to ensure surfaces are below the 12 to 14% moisture threshold before rebuilding, as outlined in this full guide to water damage restoration.
A thermal camera can suggest where hidden moisture sits. A calibrated moisture meter confirms it. One tool points. The other verifies.
What controlled demolition actually means
Homeowners often get uneasy when crews remove baseboards, drill access holes, or cut out sections of drywall. Sometimes that’s the right move.
If drywall has wicked water upward, if insulation is saturated inside the cavity, or if flooring assemblies are trapping moisture underneath, opening the assembly can speed drying and prevent deeper deterioration. This isn’t careless demolition when it’s done correctly. It’s targeted access.
Here’s the practical distinction:
| Material condition | Typical decision |
|---|---|
| Lightly affected and drying well | Preserve and monitor |
| Saturated with hidden moisture trapped behind finishes | Open for access and drying |
| Contaminated, delaminating, swollen, or structurally compromised | Remove and replace |
Drying is a measured process
Air movers and dehumidifiers aren’t there to make noise. They’re part of a controlled environment.
A good crew will position equipment based on airflow path, room volume, and the material load they’re trying to dry. Then they’ll come back, take readings, and adjust. If no one is checking moisture, the job is running on assumptions.
Ask this on day one: “What materials are your drying targets, and how will you confirm they’re dry enough for rebuild?”
That question changes the conversation. It tells the contractor you expect measurable results, not a vague estimate.
Rebuild is a separate decision
Mitigation ends when the structure is clean, dry, and ready for repair. Rebuild starts after that. Drywall replacement, trim carpentry, painting, flooring, cabinet repair, and finish matching belong to the reconstruction phase.
This is where contractor selection matters. If you’re comparing bids or trying to understand scope gaps, this expert guide to hiring contractors is useful because it frames the decision around scope clarity and accountability, not just speed.
For the claim side, homeowners should also think about whether the repair scope reflects all affected components. Here, guidance on how to maximize insurance claim payout becomes relevant. Drying the house and valuing the full loss are related, but they are not identical tasks.
Documenting Everything for Your Insurance Claim
The best insurance files are built, not improvised.
A contractor’s photos help show the job site. Your documentation needs to do more. It should tell the complete story of the loss from the first visible evidence through mitigation, contents impact, temporary living disruption, and final repair needs. If you leave that story to scattered phone photos and memory, the claim usually shrinks.
Photograph like you may need to explain it later
Take photos before cleanup changes the scene. Then keep taking them as the damage reveals itself.
Useful photos usually include:
- Whole-room views: Show the relationship between the source area and the affected finishes.
- Edge details: Capture buckling floor seams, baseboard swelling, ceiling stains, cabinet distortion, and paint separation.
- Contents in place: Photograph furniture, boxes, rugs, electronics, and stored items before they’re moved.
- Hidden conditions after opening: If drywall comes out or trim is removed, capture wet insulation, staining on framing, and moisture migration paths.
Video helps too. A slow walkthrough with spoken observations can document details that still photos miss.
Build an inventory, not a loose list
“Miscellaneous kitchen items” is weak documentation. “Small countertop appliances stored in lower cabinet exposed to water intrusion” is better. Specificity gives the claim less room to narrow your loss.
For contents, log:
| Item | Where it was | What happened |
|---|---|---|
| Area rug | Living room near exterior wall | Saturated from floor-level water spread |
| Filing box | Hall closet floor | Wet from standing water at base of wall |
| Vanity toe-kick panel | Main bath | Swollen and delaminated after prolonged exposure |
You don’t need to guess at pricing if you don’t have it yet. Start with what it is, where it was, and how water affected it.
Keep a claim diary
Insurance disputes often turn on small details that people forget after a stressful week.
Keep a running log of:
- Phone calls: Date, time, who you spoke with, and what was said
- Site visits: Who attended, what they inspected, and what they concluded
- Mitigation activity: Extraction date, equipment placement, daily monitoring visits
- Out-of-pocket costs: Hotel, meals if displacement applies, emergency supplies, and protective materials if relevant under the policy
A formal property damage assessment process can help organize this evidence into something usable, especially when the loss extends beyond one obvious room.
The strongest claims don’t rely on a single dramatic photo. They rely on a chain of evidence that shows cause, spread, condition, and cost.
Why You Need a Public Adjuster on Your Side
Most homeowners know they need a mitigation company. Many don’t realize they may also need their own claims expert.
That gap matters because the people involved in a water loss are solving different problems. The drying contractor is trying to stabilize the property. The insurance company’s adjuster is evaluating the claim for the carrier. Neither role is the same as representing your interests under the policy.
Who does what
Here’s the simplest way to understand the players.
Who’s Who in Your Water Damage Claim
| Role | Who They Work For | Primary Goal |
|---|---|---|
| Restoration contractor | The party hiring them for cleanup and repair work | Mitigate damage, dry the structure, and complete restoration scope |
| Insurance company adjuster | The insurance carrier | Evaluate the claim on behalf of the insurer |
| Public adjuster | The policyholder | Document, value, and negotiate the claim for the insured |
That middle role causes confusion. Many homeowners hear “adjuster” and assume all adjusters are neutral field experts. They aren’t. The carrier’s adjuster is part of the insurer’s process. A public adjuster works exclusively for the policyholder.
Why this changes the outcome
On water losses, claim value often slips in the same places. Hidden moisture isn’t fully scoped. Finish matching gets minimized. Wet insulation inside a wall cavity doesn’t make the first estimate. Cabinet components are treated as spot repairs when replacement is more realistic. Secondary impacts are framed as maintenance or excluded conditions.
That’s why the financial side can’t be passive.
According to Washington public adjuster settlement data, homeowners in Washington with public adjuster advocacy often receive 20 to 50% higher settlements, insurers initially undervalue water damage claims by an average of 30%, and a 2025 Washington Insurance Commissioner report noted that Whatcom County claims saw average underpayments of $15,000 before expert negotiation. Those figures line up with what many policyholders experience in practice. The first number on paper often isn’t the full number the loss supports.
What a public adjuster actually handles
A good public adjuster doesn’t just argue price. The work is broader and more technical.
- Policy interpretation: Coverage language, exclusions, limitations, and endorsements have to be read against the actual cause and progression of the damage.
- Scope development: The visible damage, hidden structural effects, mitigation needs, and reconstruction requirements have to be tied together.
- Evidence organization: Moisture reports, photos, demolition findings, invoices, and expert observations need to support the claim consistently.
- Negotiation: The carrier’s estimate often needs line-by-line challenge, not general objections.
“If it isn’t documented, many carriers will act as though it doesn’t exist.”
That’s the hard truth homeowners run into after the first inspection.
The conflict most homeowners feel but can’t name
People often say, “The adjuster seemed nice, but the estimate felt low.” That feeling usually comes from a representation gap.
The insurer’s adjuster may be professional and courteous. That isn’t the issue. The issue is that no one in that role is responsible for maximizing your recovery. The contractor isn’t either. Contractors can explain what they found, but they don’t usually interpret policy language, present the full claim, or negotiate the settlement strategy.
That’s why many homeowners benefit from learning the benefits of hiring a public adjuster before they accept the first scope or payout. Once a claim direction hardens around an incomplete estimate, fixing it becomes harder.
When representation becomes especially important
A public adjuster is particularly valuable when:
- The water traveled beyond one room
- The house has older materials or layered past repairs
- Cabinetry, wood flooring, or built-ins are involved
- There’s disagreement over hidden damage
- The carrier is moving fast toward a limited estimate
- You’re too overwhelmed to manage contractors and claim strategy at the same time
In water damage restoration bellingham wa, the physical mess gets attention first because it’s visible. The financial exposure is quieter, but it can be just as serious if no one is protecting your side of the file.
Finalizing Your Claim and Rebuilding Your Life
The end of a water claim rarely arrives in one clean moment. The drying may finish before the scope is settled. The scope may settle before all rebuild materials are available. The house can look better while the claim still needs work.
That’s normal.

What a realistic finish looks like
A well-managed recovery usually includes three things. The structure is dry. The rebuild scope reflects what was damaged. The claim file supports the amount needed to complete that work fairly.
Homeowners get into trouble when they treat payment, repair, and closure as the same milestone. They aren’t. Final payment should make sense against the documented scope, not just the first version of it.
Local perspective matters
Bellingham property owners already live with the realities of wet weather, aging homes, and occasional hidden building issues that only show themselves after a loss. Local public institutions face similar pressures. The Bellingham Herald reported that Bellingham Public Schools completed lead testing and remediation for pre-2016 facilities nearly two years ahead of Washington’s June 2026 deadline, which offers a local example of how complex property-related hazards are best handled through early action and careful documentation in this Bellingham schools remediation report.
That lesson carries over to private property claims. Complex damage gets resolved better when the response is organized early, not when people wait for confusion to clear on its own.
Keep control through the final negotiation
As the claim reaches the settlement stage, review every category carefully. Structure, contents, mitigation, rebuild, and any related living disruption should make sense together. If the insurer’s position still doesn’t reflect the documented loss, the next step is focused negotiation, not resignation.
For homeowners who need help staying firm at that stage, practical guidance on negotiating with the insurance company can make the difference between accepting a short payment and pushing for a supported outcome.
Recovery isn’t just getting the water out. It’s getting your house back and your finances protected at the same time.
The strongest recoveries come from good early decisions, disciplined documentation, and the right people handling the right parts of the job.
If your home or building is dealing with water damage and the insurance side feels unclear, NW Claims Management can help you understand the loss, organize the evidence, and pursue a fair settlement. They represent policyholders in Oregon and Washington, and their work is focused on one thing: protecting your side of the claim while you focus on getting life back in order.